
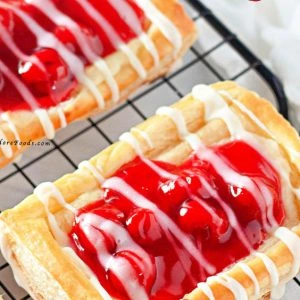

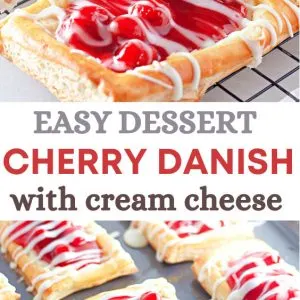

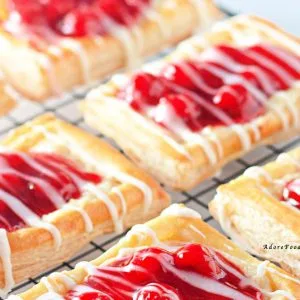
There’s nothing quite like biting into a flaky, buttery cheese puff pastry with a sweet and tangy cherry filling! These Cherry Cream Cheese Danishes are the perfect balance of crisp, golden layers and rich, velvety cream cheese.


Whether you’re making them for a weekend brunch, a special occasion, or just because you deserve a treat, these Danish pastries will make your kitchen smell like a cozy bakery. Plus, they’re so easy to make with store-bought puff pastry, so you get all the deliciousness with minimal effort!
If you love cheese Danishes, you’ll adore these homemade cream cheese puffs filled with luscious cherry topping. They’re just the right size for a quick snack, making them ideal small pastries to enjoy with your morning coffee or as a sweet afternoon pick-me-up.
With their crisp, golden crust and creamy, dreamy filling, these cream cheese puff pastries are guaranteed to disappear fast—so you might want to make a double batch!


Why You’ll Love This Recipe
I love how easy and quick it is to make Cherry Cream Cheese Danish. Using puff pastry or premade crescent roll dough cuts down on prep time, meaning I can enjoy these treats without spending hours in the kitchen.
The combination of tart cherry pie filling and sweetened cream cheese is heavenly. Each bite offers a perfect balance of flavors. The creaminess of the cheese pairs beautifully with the juicy cherries, making each bite delightful.
The danishes look like they come straight from a bakery, and the flaky, golden-brown pastry is irresistible. I always feel like I’m indulging in a little luxury when I make these at home.
These are perfect for breakfast, brunch, or even as a sweet snack. They brighten my morning and can easily impress guests. It’s wonderful to see the smiles on their faces when they take that first bite.


Ingredients
When I make a Cherry Cream Cheese Danish, I gather a few simple ingredients to create a delicious treat.
First, I start with 1 box (17.3 ounces) of frozen puff pastry, thawed to make it easy to handle. For the creamy filling, I use 1 (8 ounce) package of cream cheese, softened to room temperature.
To sweeten things up a bit, I mix in ¼ cup of granulated sugar. I enhance the flavor with 1 teaspoon of vanilla extract and save the remaining ½ teaspoon for the glaze.
For an elegant egg wash, I combine 1 egg with 2 tablespoons of water. This gives the pastry a golden-brown finish.
The main attraction is a can of cherry pie filling, which adds a burst of sweet and tangy flavor. To create a simple glaze, I blend 1/3 cup of powdered sugar with 2 tablespoons of heavy cream. This touch of sweetness drizzled on top is perfect to finish it off.


How to Make This Recipe
First, I preheat my oven to 400°F. It’s essential to get that oven nice and hot before anything else. Then I lay the two sheets of thawed puff pastry flat on my clean work surface. Using a sharp knife, I cut each sheet into 6 rectangles, making 12 total rectangles.
To help the pastries puff up just right, I score a ½ inch border around each rectangle. I don’t cut all the way through, just about halfway down. Then, using a fork, I prick around the middle of each rectangle, ensuring the center doesn’t rise too much in the oven.


Placing the pastries onto baking sheets with about an inch of space between them is next. For the creamy filling, I beat cream cheese, granulated sugar, and vanilla extract in a mixing bowl, spreading this mixture over the center of each pastry, leaving the border clear.
In a small bowl, I whisk together an egg and some water for an egg wash. Using a pastry brush, I carefully coat the ½ inch borders of each pastry. These lovely pastries then go into the oven for 18-20 minutes, emerging puffed and golden brown.
While the pastries are still warm, I add a spoonful of cherry pie filling to each center, spreading it gently. Lastly, in another small bowl, I whisk powdered sugar, heavy cream, and the remaining vanilla, drizzling it over the cooled pastries for that sweet finishing touch.


Tips and Tricks
After baking a batch of Cherry Cream Cheese Danishes, I keep any leftovers fresh by storing them in an airtight container in the fridge for up to five days. They make a delightful treat even after a few days!
When it’s time to enjoy them again, I find that a quick 10-20 seconds in the microwave brings back that fresh-out-of-the-oven warmth.
The cherry pie filling is the star, but I love experimenting with different flavors. Using “extra cherry” filling makes them even more fruity. Occasionally, I switch it up with raspberry, blueberry, lemon, peach, or apple fillings instead. Each adds its unique twist!
For a subtle twist, I swap out vanilla extract with almond extract in the cream cheese mixture. It gives the Danish a delightful nutty undertone that pairs beautifully with any fruit filling.


Frequently Asked Questions
How do I create a flaky crust for a Cherry Cream Cheese Danish using puff pastry?
To get that satisfying flaky crust, I start with a quality puff pastry. By chilling the pastry before use and handling it minimally, I help maintain the layers. Baking at a high temperature encourages the dough to rise and separate, creating that classic, flaky texture.
Can I make a Cherry Cream Cheese Danish with crescent roll dough?
Absolutely, I can use crescent roll dough as an alternative for a quick version. It’s easy to work with, and after rolling it out, I simply spread the filling and fold the dough over. This method results in a softer texture compared to puff pastry, but it’s still delicious.
Is it possible to make a Cherry Danish without adding cream cheese?
Yes, I can exclude cream cheese if desired. Instead, I might choose to focus on enhancing the cherry filling or try different fillings like almond paste for something unique. The Danish will still hold its charm and taste delightful.


Cherry Cream Cheese Danish Recipe
These Cherry Cream Cheese Danishes are flaky, buttery, and filled with a rich cream cheese filling and sweet cherry topping. Made with store-bought puff pastry, they’re an easy and delicious treat perfect for breakfast, brunch, or a quick snack. With their golden, crispy layers and creamy center, these cheese puff pastries will be your new favorite homemade Danish pastries!
Leslie
Tuesday 26th of August 2025
yum!